
 Well half term passed in a whirl of fun and frolics, and back to school this morning in a blizzard - proper face fulls of snow. Every year it's hard to believe that spring can only be a matter of weeks away, it's always a surprise when the season suddenly changes. Anyway in an attempt to inject a bit of colour into my white-out world, here is my Doodle Quilt Tutorial;

2. Trace each of your doodle loops onto freezer paper
 3.Cut out the doodle shape on the traced line, then iron onto the wrong side of the fabric you choose.
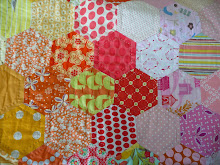
4.Cut out approx 1/4 inch around the ironed on freezer paper shape

5. Using a water soluble glue, stick the edges around the shape, easing around the curves to make a smooth edge. Make all of your coloured 'doodles' shapes this way

6. Decide on the colour for your doodle-line. I decided to go with a graphite grey ( Kona Coal). Cut strips on the bias. To make the doodle line you will need a bias tape maker. I used a Clover 12mm (1/2") version ( the yellow one). Using this size I cut 1inch strips on the bias. You then feed them into the bias tape maker and iron as you pull the tape through the maker - it's magic.
 7. Join the strips end to end to make a long length.
8. Using your paper template lay your quilt top on top and trace using a soft pencil the doodles on to your quilt top. It can help to outline the doodle on the paper with a black marker pen first.
9. Take the bias strip and fold it in half along it's long length. Begin to pin to the quilt top. When you reach a doodle circle gently ease around the shape folding the shape inside the bias tape by wrapping it around the edge as shown below. Pin in place to the quilt top. Continue across the width of the quilt top.

 10. Then using the sewing machine sew along the edge of the bias, this will also catch the edge of the doodle shapes too.
11. When you have done all of the doodles, working from behind cut out the excess fabric from behind the doodle shapes, exposing the freezer paper. Then put the quilt top in warm water and gently pull out the freezer paper
12. Dry and iron the quilt top.

Have fun doodling!


Hi, Deb. Just found your blog. Have always meant to start a quilt - I've been saving little cotton dresses my daughter has grown out of to use the fabric in a quilt for her (one day, when I get round to it..). But now that I've seen your designs I don't know whether to be inspired or intimidated! Will let you know of my progress. If I mean when I get started! X
ReplyDeletethis is a fab idea! Love all this sharing of creative ideas over the net!
ReplyDeleteAmelia.x